The iPhone, born as a simple communication tool, quickly evolved into a real multimedia production center. What until a few years ago was a process relegated to powerful desktop workstations and complex software, today is accessible to anyone, directly in the palm of his hand. If the original article has touched the basics of video editing on iOS, introducing essential tools such as Photo, iMovie and third-party apps such as InShot and CapCut, the current reality of mobile video goes well beyond the simple size and sew. The real challenge for the modern content creator lies in transforming a good recovery into a professional quality content, able to compete with the productions made with much more expensive equipment. The transition from ‘basic editing’ to ‘advanced production’ requires an understanding not only of the basic functions (such as cutting, applying filters and adjusting speed, previously treated) but also of the most sophisticated techniques: from precise grading, to the wise use of the keyframe, up to the impeccable management of audio and format optimization for specific social platforms. The iPhone 15 Pro, for example, not only records in 4K at 60 frames per second, but also supports the format ProRes, a high-fidelity coding standard that preserves a significantly greater amount of data than traditional compressed formats, providing a huge margin of manoeuvre in post-production, especially for color correction. This is not just a technical detail; it is the key to elevate editing work to a higher level. It is no longer just to remove the unwanted parts of a video, but to build a coherent visual narrative, emotionally resonant and technically inexplicable. The goal of this extended guide is to provide the necessary knowledge and strategies to fully exploit the hidden potential of your iPhone, transforming it from a convenient recording device into a mobile editing studio, allowing you to create content that not only capture attention, but reflect a high-level production expertise. Forget the idea that professional editing is confined to the desktop world; the era of pocket cinema is here, and learning how to master these techniques will position you at the forefront of creating digital content. To achieve stunning results it is not enough to have apps, but it is crucial to understand how to exploit their most complex features and how to integrate them into an efficient workflow, from capture to final export, taking care of every detail, from digital lighting to sound dynamics.
The iOS Ecosystem and the Revolution of Mobile Video Production
The ability of an iPhone to manage professional video editing is not only due to the presence of specific applications, but is inherently linked to the entire hardware and software ecosystem developed by Apple. This synergistic link between the efficiency of the A-series chips (or M in the latest iPad models, which share the same basic operating system for editing apps) and iOS optimizations, creates a robust and incredibly fast platform for media processing. The unified computing power ensures that complex operations, such as rendering high-bitrate 4K movies or simultaneous application of multiple levels of effects and color grading, occur with a fluidity that was unthinkable for a mobile device even five years ago. The real breakthrough, as mentioned, is the introduction and native management of advanced recording formats. The Cinematic Mode, for example, is not only an aesthetic effect of blurring the background, but a complex set of depth data that the editor can manipulate in post-production, allowing you to change the focal point of the video after it was filmed. This requires an editing application that can interpret this data, such as iMovie or, better yet, LumaFusion or CapCut, to perform smooth and intentional focus transitions, adding a level of narrative sophistication. In addition, support for format Apple ProRes on Pro models elevates the quality of the broadcast standard turn. ProRes, being a less compressed codec, maintains a dynamic range and a much wider chromatic detail. Although ProRes files are extremely voluminous (a few hours can occupy hundreds of gigabytes), their native management within iOS means that apps can access and manipulate these data efficiently, opening the doors to techniques of grading that would otherwise cause color break (banding) in the most compressed codecs (such as H.264 or HEVC). This deep integration also extends to the workflow: automatic synchronization through iCloud Photos and the speed of transfer of large files through AirDrop they facilitate fast moving of clips between iPhone, iPad and Mac, reducing bottlenecks that often slow down production on less integrated platforms. For those who seriously dedicate themselves to video making, it is essential to understand that you are not simply using a phone to edit, but you are interacting with an ecosystem designed for multimedia efficiency. Making full use of this power means switching from a simple assembly operation to a real professional post-production session, where the stability of the operating system and the power of the chip allow you to focus on creativity without being limited by excessive rendering times or application crashes. The iPhone has become a crucial bridge between the recovery phase and the finished product of high quality, making accessible features previously reserved to high-end mounting studios.
Master iMovie and Hidden Features of the Photo App for Precision Editing
Although iMovie is often considered the Apple’s “for Beginners” editing tool, its features, especially when combined with the hidden capabilities of the Photo app, are a solid and powerful basis for fast and quality editing. Many users stop at simple import and linear cut in iMovie, ignoring the tools that elevate mounting to a higher narrative level. The winning approach with iMovie is to see it not only as an editor, but as a assisted narrator. For example, the function Storyboard or Trailer defaults (meaning briefly in the original article) are incredibly useful for those who are at first hand with the narrative structure of a video. These models guide the user not only in the choice of clips, but also in their length and positioning, implicitly teaching the assembly rhythms and the effective use of transitions. For iMovie, a crucial aspect is the management of audio levels: many do not know that iMovie allows a granular control of the volume for clips, allowing to apply audio fade and balance the sound column with the spoken (outfield voice), essential for a clean final product. To access these controls, simply touch the clip twice on the timeline and use the audio options that appear, also adjusting the background noise reduction if necessary. Passing to the Photo app, the most trivial but often underestimated solution, is here that the basic color correction tools are hidden that, if used correctly, can eliminate the need to open third-party apps for simple touches. After selecting ‘Edit’ on the video, the user can access the card Rule (dial icon). In addition to automatic adjustment, iOS offers manual sliders for Exhibition, Contrast, Light Points (Highlights), Shadows (Shadows) and Nitidezza. The strategic use of Light points and O it is vital: by reducing light points, details are recovered in the overexposed areas (such as a sky too bright), while increasing shadows clear the dark areas, increasing the perceived dynamic range of the video. This micro-regulation before mounting in iMovie ensures that all clips have a uniform color balance. Finally, iMovie supports the function Picture-in-Picture or green screen (chroma key), allowing you to overlay a clip (for example, a reaction or a logo) over the main video. These techniques, often associated with more complex software, are perfectly executable in iMovie, transforming it from a simple clip to a true multi-level mounting tool, provided the user thoroughly explores the timeline editing menu after selecting a clip.
CapCut and InShot: The Passage from Amateur Editing to The Semi-Professional
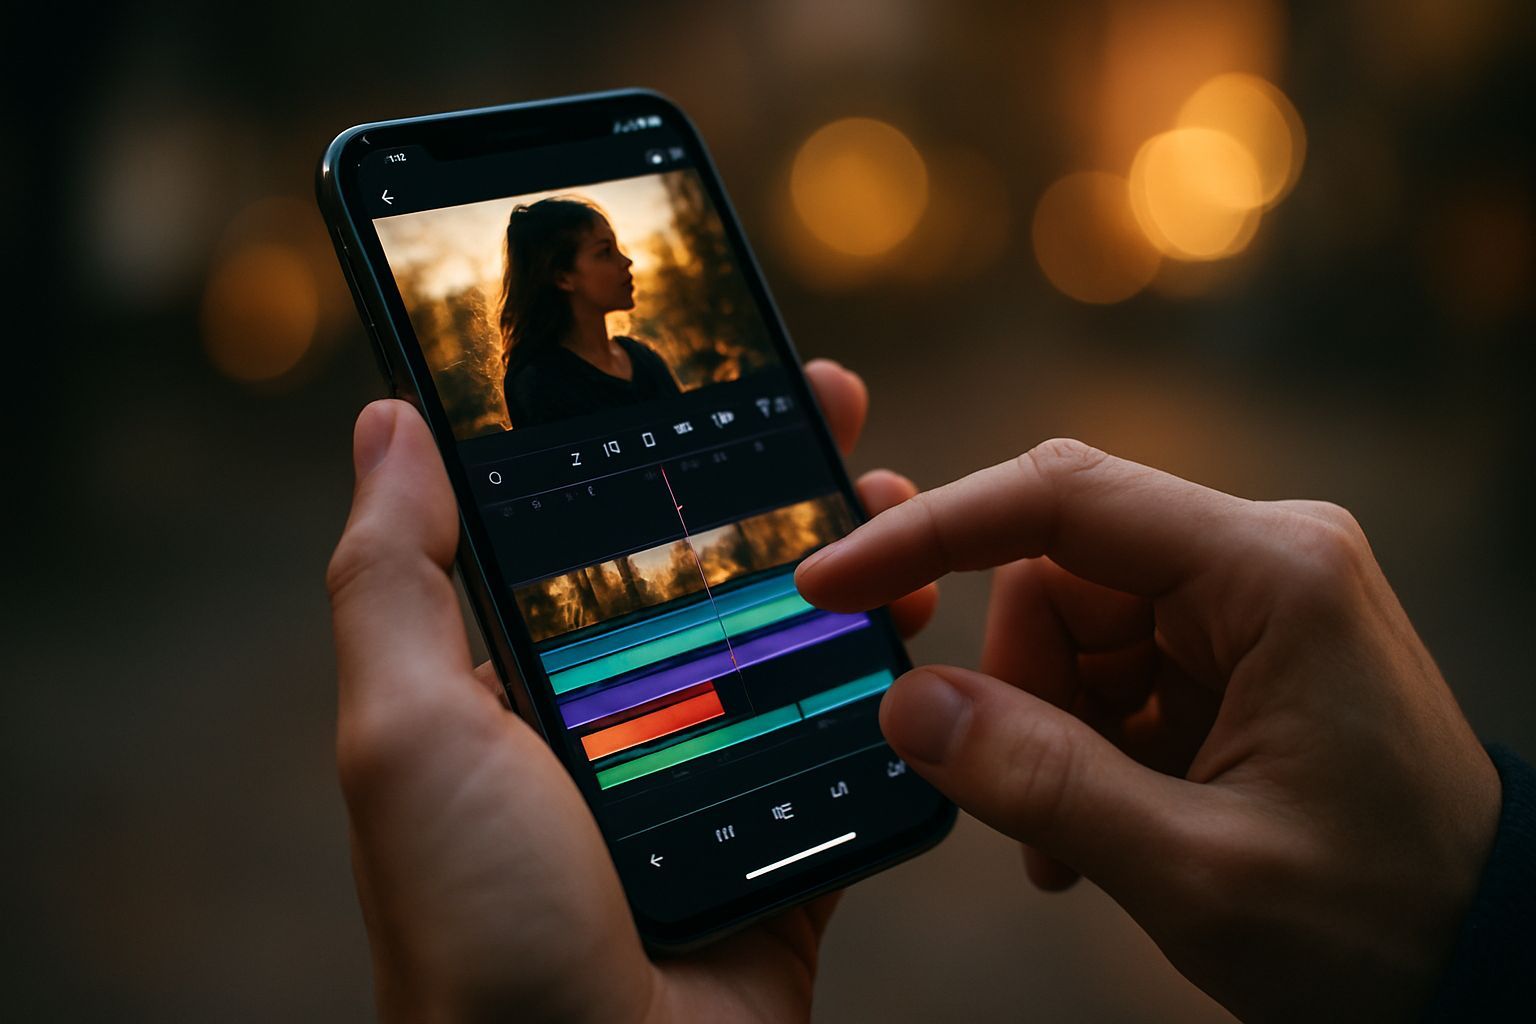
Third-party apps such as InShot and CapCut represent the true frontier of iPhone-accessible video editing, offering a soft learning curve but features that rival with medium-range desktop software. While the original article introduces them as tools to “add emoji and filters”, their power lies in the advanced control capabilities of movement and effects, especially through the use of Keyframe. Keyframes are essentially markers that define a state (position, size, opacity, rotation) of an element at a specific timeline moment. The application automatically fills the range between two Keyframes, creating a smooth animation. For example, if you want a text to appear small on the lower left and then enlarge moving to the center of the screen within three seconds, a Keyframe will be set at the beginning (small, lower) and another three seconds later (big, middle). CapCut, in particular, made the use of extremely intuitive Keyframes, applicable not only to texts and stickers, but also to the video clip itself (for dynamic zoom, simulated panoramics or trembling effects). This controlled animation capability is essential to create dynamic and engaging videos, typical of viral content on platforms such as TikTok and Instagram Reels. InShot, while maintaining a focus on simplicity, excels in format editing and fast mounting. Its interfaces for adjusting proportions (Tela) and the addition of music (with precise cuts based on the beat) are among the fastest on the market. The Pro version of both apps offers significant advantages, which go far beyond the simple removal of the watermark: CapCut Pro unlocks advanced features chroma key (remotion of the background), tracking of movement (to follow a text or sticker to a moving object) and extensive libraries of exclusive effects and filters, essential for those who produce content with frequency. InShot Pro, however, often provides access to premium transitions and optimized color presets. It is crucial to note that the learning curve for the advanced use of these apps is short. Spending time experimenting with options Blending Mode (or fusion mode, which determine how two levels combine, as Multiply or Screenshot) and level management (Overlay), the user can quickly switch from simple mounting to complex visual effects, such as adding realistic light effects or texture overlap. These apps, while being free in their basic version, hide professional editing tools that, if mastered, eliminate the gap between the content “made with the phone” and high quality production.
Color Grading Professional and Tone Correction on Mobile
Color Grading is the artistic process that gives the video the final appearance and the desired emotional atmosphere. Often confused with the simple correction of color (which aims only to make whites and blacks), the grading on iPhone is now possible thanks to the management of ProRes data and the sophistication of the most advanced editing apps like CapCut, Splice, or alternatives such as LumaFusion (although paid, it is a de-facto standard for professional mobile editing) and even the mobile version of DaVinci Resolve. Going beyond the simple preset filters is the first step towards a cinematic look. Filters tend to apply global and uniform changes, flattening the image, while professional grading requires selective control. The basic technique to master is the use of HSL curves and manipulation (Hue, Saturation, Luminosity). The RGB curves, available in apps like CapCut or LumaFusion, allow you to adjust brightness and contrast in a non-linear way. For example, a ‘S’ curve accentuates contrast, making blacks darker and whiter, giving a more dramatic look. Adjusting individual curves (only the Red, Green or Blue curve) you can introduce specific shades in shadows or lights, a standard method to get a ‘teal and orange’ look, popular in modern films. Even more powerful is control HSL. This tool allows you to isolate a specific color in the image and change only the shade (change yellow in orange), saturation (render it more vivid or more off) or brightness (scratch it or darken it). This is vital for consistency: if a video has clips turned in different light conditions, you can uniform the skin tones (often in the orange range) or make the sky constantly blue. Another advanced technique is the use of LUTs (Look-Up Tables). An LUT is essentially a preset formula that transforms a set of chromatic values into another. Many professionals turn in ‘flat’ or logarithmic mode (which records a low contrast image to maximize the dynamic range) and apply a post-production LUT to “normalize” the image and give it a specific film look (for example, the look of a Kodak or Fuji film). The most advanced apps allow you to import custom LUTs, ensuring that the final colors are exactly the desired ones, ensuring a distinctive and professional visual aesthetic in every single frame of the video project. The consistency of the color is not only aesthetic, but is fundamental to the perception of quality by the viewer.
Audio Mastering and Sound Design: The Birth of the Video
Often, amateur editors focus exclusively on the visual aspect, neglecting the audio component, which, if poorly managed, can drastically degrade the quality perception of a video, regardless of the perfection of the images. The sound design on iPhone, while being limited to a desktop DAW (Digital Audio Workstation), still offers essential tools for mastering and sound cleaning. The first step is the cleaning of the main audio. If it is a video spoken (vlog, interview), the elimination of background noise is crucial. Apps such as CapCut (which offers a noise reduction function with only one tap) or Splice allow to attenuate the wind or ambient buzz. However, it is always better to record the audio separately with an iPhone-compatible external microphone (for example, a wireless lavalier or a USB-C condenser microphone) to get a clean source track, which can then be synced with the video in the timeline. Once cleaned, the audio must be balanced. This process is known as Mixing. A common mistake is to keep the background music too high, overcoming the voice. The general rule for spoken-based content is that the main voice should be the dominant sound (at a constant level, often through an automatic or manual compression process) and background music should be lowered significantly (often up to -15 dB or -20 dB compared to the voice) during the spoken segments, and then resume volume in transitions or purely visual parts. Audio level management is critical and almost all apps offer the possibility to insert Audio Keyframe to automate fade-in and fade-out) and volume changes in precise points. The Sound Design true goes beyond music and includes sound effects (SFX). The strategic addition of SFX (for example, the sound of a snap for a fast transition, a notification sound for a text that appears, or a whoosh effect for a quick movement) increases the impact and dynamism of the video. Many advanced apps offer royalty-free SFX libraries that can be inserted and aligned with frame accuracy for frames. Finally, the last phase is mastering, which in the mobile environment is to ensure that the total final volume (the ♪) is optimized for the target platform, usually following the LUFS standard (Loudness Units Full Scale) required by YouTube or Spotify, although the iPhone generally automatically manages a basic export optimization on social platforms. A well-fitted video with poor audio will never be perceived as professional, so devoting time to soundtrack is a critical investment.
Advanced Workflow and Dynamic Mounting Techniques: The Narrative Rhythm
The effectiveness of a video, especially in the context of social media where attention time is minimal, largely depends on its narrative rhythm and dynamic editing techniques used. An advanced workflow on iPhone must incorporate mounting strategies that capture attention in the first three seconds and maintain interest through creative transitions and a tight pace. The first technique to master is the J-Cut and L-Cut, two pillars of professional assembly. A J-Cut occurs when the audio of the next clip begins before the image changes, anticipating action or dialogue (useful for interviews). An L-Cut is the opposite: the next video begins before the audio of the previous clip is finished, often used to maintain sound continuity while showing a different image. These transitions, which can be accurately handled in apps that support a detailed display of the timeline (such as LumaFusion or CapCut), make the transitions between the smoothest and most natural scenes compared to dry cuts. Subsequently, the use of Cutaways (B-Roll). The B-Rolls are secondary films, often of details, landscapes or related actions, which are inserted above the main film (A-Roll, typically speaking) to illustrate what is said, mask the mounting jumps (jump cuts) and add visual interest. A professional workflow always involves recording A-Roll and B-Roll; editing on iPhone must devote a separate layer to inserting these cutaways, ensuring that they are synchronized with the spoken and maintain a consistent chromatic aesthetic. As for rhythm, it is essential to change the duration of the clips. Slow and meditative videos can use 5-10 seconds long clips, but dynamic social content often require clips lasting between 0.5 and 2 seconds. Many apps offer the ability to mark beat marker to synchronize cuts directly with the rhythm of background music, an extremely effective method to create high-energy mounts. Finally, the Dynamic transitions go beyond the simple cross fade. Apps like CapCut are famous for their effects-based transitions (like shake, zoom rapid or ♪), which must be used with patience, but which, when applied with intention, can accentuate the passage between two different ideas or between two temporal moments. Accuracy editing requires zoom in and out on the timeline to see each single frame, a feature supported by almost all professional mobile editing apps, which allows you to align sound and visual effects with maximum accuracy, ensuring that each video element contributes to the desired pace.
Optimization and Formatting: Create Content for Platform Specifications
Professional video editing does not end with editing and grading, but includes a critical phase of optimization and formatting to ensure that the content is best presented on the target channel. Each social platform (YouTube, TikTok, Instagram Reels, X) has specific requirements in terms of objective (proportions), maximum duration and recommended compression formats. Ignoring these standards leads to unwanted crops, black bars or a reduction in perceived quality. For vertical content (most mobile content), standard proportions are 9:16 (1080×1920 pixels). Platforms like TikTok and Reels prefer this format. It is essential that the editor maintains the main action within the ‘safe zone’, avoiding placing crucial elements where they could be covered by the platform user interfaces (for example, like buttons or description). Apps such as InShot or CapCut have dedicated ‘Tela’ or ‘Canvas’ tools that facilitate the adaptation of 9:16 clips, including the option of filling empty sides with a blurred background or a solid color. For YouTube, although long content privileges the 16:9 horizontal, YouTube Shorts use the 9:16 vertical. An efficient workflow often involves creating two versions of the video: a horizontal for the main channel and a vertical cut or reassembled for short content, optimizing the frames for each format. The choice of Frame Rate (FPS) is also crucial for optimization. For a cinematic look, 24 FPS is the standard. However, if the video includes slow-motion, it is essential to turn to 60 FPS or 120 FPS and then slow down the clip smoothly (reducing it to 24 FPS in post-production). Final export also requires attention to resolution and bitrate. If you are shooting in 4K, it is often recommended to export to 4K (although the video is seen on a smaller screen), because social platforms assign a higher compression bitrate to 4K videos, resulting in a 1080p video played sharper. Most mobile editing apps allow you to select these parameters (Resolution: 4K/1080p, FPS: 24/30/60, Format: MP4/MOV). If the target is the highest quality on YouTube, exporting with a high VBR bitrate (Variable Bit Rate) is ideal, although this increases the file size. The attention to these technical details ensures that editing and color grading work is preserved faithfully online, avoiding the unpleasant “social pressure” that flattens details and fades colors.
Workflow Management Video: Storage, Backup and Productivity
The latest key element for a professional mobile video editor is efficient workflow management, which includes massive storage, secure backup and productivity maintenance. Working with 4K and ProRes files on iPhone quickly exhausts the internal storage space, making it necessary a well-defined data management system. The first obstacle is import and storage. For Pro users who register in ProRes (which can consume up to 6 GB per minute), use of one External SSD is almost mandatory. Recent iPhone and iPad models with USB-C port allow recording and editing directly from an external SSD drive, completely bypassing the internal space limits. This not only frees memory, but accelerates transfer and rendering times, as the external drive offers read/write speeds higher than those of many SD cards. For the backup phase, iCloud is useful for smaller files, but for massive projects, cloud-based media storage solutions (such as Frame.io, although team-oriented, or services like Google Drive/Dropbox with additional space) or a personal (Network Attached Storage) NAS are preferable. It is vital to adopt the “3-2-1” rule for backup: three copies of the data, on two different types of support, with a copy stored outside (off-site). In terms of productivity, the use of an iPad Pro with Magic Keyboard can transform mobile editing, providing a larger screen interface and the use of keyboard shortcuts (such as J, K, L for multimedia transport or B for cutting in LumaFusion), which significantly reduce the time spent touching the screen. Professional apps such as LumaFusion also allow media organization via tags and folders, a media management system that prevents confusion when working on multiple projects simultaneously. Keeping the iPhone or iPad with enough free space for cache and rendering files (often called temporary files) is another crucial factor in software stability; if the device is short of memory, editing apps will tend to slow down or block while exporting. Finally, the review and feedback cycle: if you work with customers or teams, platforms such as iMessage or Telegram (as mentioned in the original article for offers) can be used for quick sharing of the draft, but the use of frame marking tools (such as CapCut review links) is more professional, allowing employees to leave precise comments on specific timeline points. Mastering this workflow not only speeds production, but ensures that the data is safe and that the equipment is always ready for the next recovery, raising the entire process of mobile video production to a truly professional standard.


