The air fryer has become, over the last few years, an indispensable element in modern kitchens, thanks to its ability to combine crispness and health. However, with the frequent use typical of 2026, it inevitably accumulates residues of fat and food fragments that can compromise the taste of food and the energy efficiency of the appliance. Knowing how to disassemble air fryer it is not only a matter of hygiene, but a real act of preventive maintenance that can significantly extend the life of your small appliance. Many users simply wash the basket, ignoring that the most insidious encrustations are nested close to the resistance and intercapedies of the fan. Proceeding to a reasoned disassembly allows to igienzzare every corner, avoiding the fumes of the burned fats alter the quality of the air in the kitchen or, worse, cause technical breakdowns. In this comprehensive guide, we will explore the safest methods and secrets of technicians to disassemble the most popular models on the market, ensuring that every operation is carried out in full compliance with safety standards. Prepare to discover how to transform ordinary maintenance into a professional intervention to bring your air fryer back to the fasts of the first day of purchase.
Preparation and safety before starting disassembly
The tools needed for effective intervention
Before starting any technical operation on how to disassemble air fryer, it is essential to organize the working space and equip itself with the correct tools to avoid damaging plastics or fastening screws. In spite of many components, some models require the use of specific screwdrivers, often cross type (Phillips) or, in rare cases for external shells, type Torx. In addition to the hardware, you will need a range of cleaning accessories: high quality microfiber cloths, a non-abrasive sponge, a soft bristle brush to reach the most cramped corners of the resistance and, of course, a delicate degreasant cleaner or a natural solution based on vinegar and bicarbonate. Putting everything you need on a clear and well-lit worktop will allow you to proceed with order, avoiding losing the small screws that you will go to remove during the opening stages of the panels or the handle.
Cleaning of the internal components also requires the use of durable kitchen absorbent paper, useful to remove the first layer of grease without spreading dirt on clean parts. If your fryer has particularly stubborn carbonized accumulations, you may consider buying a specific degreasing machine for cold ovens, which acts in a few minutes without excessive rubbing. Remember that delicacy is the key: modern appliances plastics are heat resistant but can easily scratch or crack if under improper pressure during dismantling. A set of plastic levers (similar to those used to repair smartphones) can be extremely useful to separate shells of the shell without leaving permanent marks on the outside design of the appliance, ensuring an impeccable final result from the aesthetic point of view.
Electrical and thermal safety measures
Safety must be your absolute priority when you decide to manipulate an electrical appliance. The first step is to physically disconnect the plug from the socket. It is not enough to turn off the digital or general switch of the kitchen; the fryer must be electrically isolated to avoid accidental shocks due to residual currents in the capacitors. Moreover, considering that air fryers reach temperatures close to 200 degrees Celsius, it is imperative to wait for the appliance to be completely cold. In 2026, many models have advanced thermal insulation that retains heat for a long time: it is recommended to wait at least two hours from the last use before attempting the heat disassembly of the shell or removal of heating resistance.
During the working phases, it absolutely avoids touching the printed circuit boards if you decide to open the upper part of the appliance, unless you have specific technical skills. The main objective of our intervention is thorough cleaning of mechanical parts and air ducts, not the repair of electronic components. If you notice slipped cables or burn marks on contacts during opening, stop the operation and contact an authorized service center. Safe operation also means protecting your hands: the use of latex or nitrile gloves will protect you not only from the chemicals of detergents, but also from any sharp metal edges that could be inside the engine compartment or near the ventilation fan, often not finished with the same care of the external parts visible to the consumer.
- Always unplug the power cord before you start.
- Wait for the total cooling of the cooking room.
- Use protective gloves and eye protection if you use degreasing sprays.
- Document each step with photos to facilitate reassembly.
Universal procedure to disassemble the main components
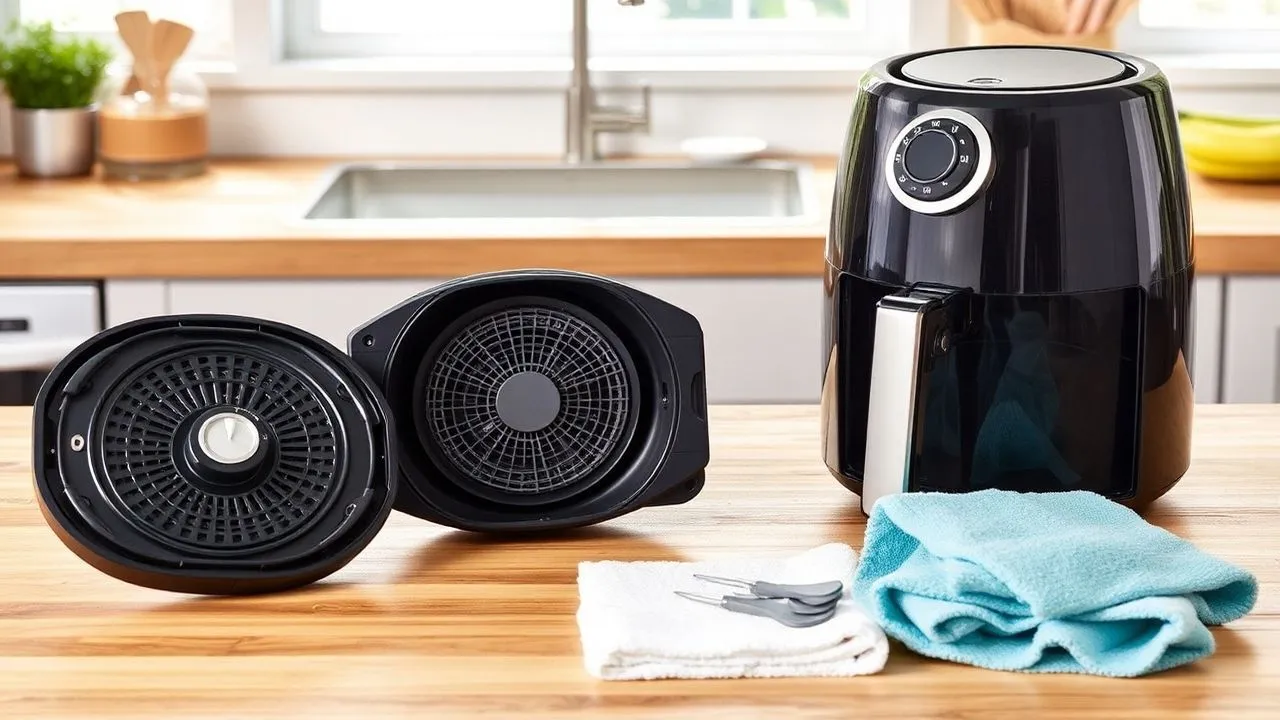
How to extract the basket and the internal grill
The heart of each air fryer is the heat circulation system that crosses the basket. Learning how to disassemble air fryer starting from the cooking compartment is the simplest but fundamental operation. In most modern models, the basket is simply pulling the handle out. However, for radical cleaning, it is necessary to separate the perforated basket from the external container (the collection tank). Usually, on the handle there is a release button protected by a transparent plastic safe. Moving the safe and pressing with decision, the two components separate. This operation allows you to eliminate the fat deposits deposited on the bottom of the tank, which often remains hidden during daily rapid washing and can become rancid over time.
Once these pieces are separated, it is possible to remove the internal grille or the perforated tray. Many manufacturers use small silicone rubbers on the edges of the grills to avoid scratches to the non-stick coating. During disassembly, be careful not to lose these small components, as they are vital for the stability of the grid during operation at high air speeds. If the grill is crumbled, the advice is not to force the extraction with metal tools; dip the whole block in hot water and soap for about thirty minutes. This will soften the fat residues and will make the natural and safe extraction, preserving the integrity of the Teflon or ceramic layer that guarantees the non-adhesion of your favorite foods during daily cooking.
Disassembly of the handle and removable parts
The handle of the fryer is often the occult recipe of dirt and bacteria, since it is constantly touched with the dirty hands of food. Dismantling the handle may seem complex, but it is usually fixed with two or three screws hidden under aesthetic caps or behind the front plate. By removing these screws, it is possible to separate the external plastic of the handle from the metal frame. This procedure is very useful if you notice that the handle is packed or if you have infiltrated the liquid inside the joints. Clean these enclosures with a microfiber cloth funneled with denatured alcohol will completely sanitize the part, eliminating any trace of organic residue that could generate bad smells in the long term.
Other removable parts that deserve attention are air filters, if present in your specific model. Some 2026 high-end fryers incorporate small filters to active carbons or thin metal networks to reduce odor leakage. See technical manual to understand how to unhook them without breaking plastic clips. Often a slight side pressure is enough. If the filter is metal, it can be washed; if it is active carbon, it will be replaced according to the timing indicated by the manufacturer. Keeping these exhaust ducts clean is essential to prevent the fan motor from going under stress due to excessive aerodynamic resistance, thus ensuring a low noise and a uniform cooking comparable to that of a brand new appliance.
- Locate the basket release button.
- Remove the hidden screws of the handle with the suitable screwdriver.
- Gently extract silicone seals.
- Unplug the air filters from the rear compartments.
- Catal the removed screws not to confuse them during reassembly.
Deep cleaning of resistance and upper fan
Access the thermal part without damage
When asked how to disassemble air fryer for a maintenance by experts, thought immediately runs to electrical resistance. This component is located at the top of the cooking room, right above the basket. To access it comfortably, the most effective method is to flip the appliance after removing the basket. In this position, resistance and heat distribution fan are well visible. In some models, a metallic protection grate prevents direct contact: this grate is usually fixed with small screws or ink. Remove it is essential to clean heating resistance, which over time covers splashes of fat that, by burning, produce the typical annoying acre smoke during the cooking.
Once the resistance is exposed, do not attempt to disassemble it completely from the electric circuit unless you have to replace it. Cleaning can be done in situ with extreme effectiveness. Use one non-abrasive degrease or a baking soda and water paste, applying it with a toothbrush. Let it act for ten minutes, taking care not to make liquids in the holes of the fan or in the electrical joints. The fan itself, located behind the resistance, can be cleaned gently by sliding a damp cloth between the blades. If your model allows it, you can unscrew the central fan nut to remove it and wash it separately, but be careful: often these fans have a reverse thread (they unscrew clockwise) to prevent them from unscrewing themselves during fast rotation.
Removal of carbonized fat residues
Carbonated residues are the number one enemy of the thermal performance. When fat deposits on the serpentine of resistance, it acts as an insulator, forcing the electrodomestic to consume more energy to reach the set temperature. To remove these encrustations without damaging the metal, it absolutely avoids the use of metal or knives. The correct technique involves the use of steam or chemical degreasants formulated to not affect stainless steel. Once applied the product, the chemical reaction will dissolve the bond between carbon and metal, allowing you to remove everything with a soft sponge or a cotton cloth. This phase of the procedure on how to disassemble air fryer requires patience and surgical precision.
In addition to the resistance, it is vital to clean the upper vault of the cooking chamber, that is the metal surface surrounding the fan. This area acts as a heat reflector: if it is blackened or encrusted, the heat will not be distributed evenly downwards. Use a soaked cloth of a lemon and vinegar solution to degrease and at the same time neutralize the bad smells. After cleaning, make sure to pass a clean cloth filled with water only to remove any trace of detergent, which otherwise could evaporate during the first next ignition, contaminating food with chemical smells. Accurate cleaning of the upper and upper vault heating resistance ensures that the air circulates at the highest possible speed, keeping intact the promise of a healthy and fat-free fry added.
Periodic cleaning of the resistance is not only an aesthetic fact: it prevents the overheating of the fan motor and significantly reduces the risk of small domestic fires caused by the burning of accumulated fats.
Specific guide for Philips and Aries models in 2026
Structural features of the Philips Airfryer series
Philips fryers, pioneers of the industry, are known for their sophisticated engineering and for the “Starfish” design of the bottom, designed to optimize air flow. If you own a Philips model and look for information about how to disassemble air fryer of this brand, you must know that the company is very focused on the ease of cleaning, but also on the protection of its patents. Many components of the Essential or XXL series are dishwasher-washable, but the disassembly of the upper shell requires the use of precise tools. On the Philips official website, by entering the model number (which you find on the label below the base), you can access detailed exploded patterns. These drawings are essential to understand where the pressure clips are located that hold the side panels together to the metal frame.
For the latest Philips models of 2026, resistance access is facilitated by a quick release system of the protection grid. However, it is necessary to pay attention to the temperature sensors (thermers) located near the serpentine. During cleaning the internal components, make sure you don’t move or fold these sensors, because their incorrect location could cause high temperature readings and sudden switching off of the appliance. If you need to replace a part, Philips offers a very extensive spare parts network. Remember to always download the latest version of the manual in digital format, since the disassembly procedures can undergo slight variations between the different batches of production, even at the same aesthetic model, for constructive optimizations carried out by the mother house over time.
Disassembly of components in Aries fryers
Ariete offers models often characterized by an excellent value for money and lines that recall the vintage or modern style. As regards how to disassemble air fryer Aries, the procedure is usually more linear than the North European models. Many models of the Airy Fryer line have a classic drawer structure where the fixing screws of the rear shell are well visible. Remove the outer shell allows you to easily access the cooling fan of the electronics, a zone where you often accumulate environmental dust that can hinder the proper cooling of the motherboard. A compressed air cylinder can be your best ally at this stage to remove dust without touching sensitive circuits.
For the disassembly of the Ariete basket, it is important to check the status of the screws that fix the handle to the tub. Due to the moisture sprinkled during cooking, these screws can sometimes show signs of oxidation. If you experience resistance, use a release drop for threads before forcing with screwdriver, to avoid “expanding” the head of the screw. Once you remove the handle, you can immerse the tub in a deep degrease solution. Ariete often recommends in his frying instructions manual not to use too aggressive detergents on colored plastics to avoid fading. Following these specific indications, you will keep your Ariete not only functional but also beautiful to see, as a real piece of technological furniture in your kitchen of 2026.
- Check the product code under the base of the appliance.
- Access the official support portal to download technical PDFs.
- Check the presence of screws under the rubber feet.
- Use original spare parts to keep the warranty valid.
Maintenance for popular brands: Princess, Innsky and Uten
Management of manuals and digital documents
Brands that have dominated online sales, such as Princess, Innsky and Uten, often adopt standardized but effective construction solutions. If you have purchased one of these fryers and no longer find the paper booklet, do not despair: the procedure on how to disassemble air fryer is digitally documented. Princess, for example, offers a database very provided on its website. For Innsky and Uten, brands very present on platforms like Amazon, the manual is often available directly on the product page under the section dedicated to technical documentation. Download the PDF allows you to identify with certainty what parts are considered “user-serviceable” (maintainable by the user) and which instead require the intervention of a professional not to invalidate the legal guarantee of two years.
In these manuals you will often find chapters dedicated to troubleshooting (troubleshooting), explaining how to access filters or how to disassemble the touch control panel if this should show signs of moisture failure. A valuable advice for Innsky and Uten fryers owners is to also consult the “Domande and Answers” sections of the big online stores: often other users have already faced the problem of disassembly of the shell and share specific tricks, such as the hidden clip position or the exact size of the screws needed for reassembly. The sharing of knowledge in the community of technological “foodies” is an invaluable resource in 2026 for those who love the responsible DIY and want to take care of their kitchen tools.
Differences between drawer and oven models
We must make a clear distinction when talking about how to disassemble air fryer between drawer and oven models (air fryer). The oven models, very popular for their versatility, are more similar to a traditional oven. The front door is usually removable by dismantling the side hinges, which greatly facilitates the cleaning of the internal glass, where the fat tends to cular and to create unsightly alonies. In these models, the inner walls are often made of stainless steel and can be dismantled by unscrewing the side panels for even more radical cleaning. This structure allows much more direct access to the fan and resistance than compact drawer models.
In the oven fryers of brands like Princess or Uten, you can also remove the side guides for the pans. This passage is fundamental because behind the guides there is often a surprising amount of carbon residues. Clean these areas with one degreasing machine for oven non abrasive prevents the formation of smoke during cooking fat foods such as chickens with spit or abundant fries. On the contrary, in the drawer models, the disassembly is more focused on the separation of the components of the basket and the cleaning of the upper vault. Regardless of the model, the golden rule remains the same: proceed calmly, never force the plastic components and make sure each piece is perfectly dry before putting it back in place, to avoid short circuits or rust formation on the untreated metal parts.
- Remove the internal pans and accessories (rolling, rotating baskets).
- Unlock the front door by acting on the hinges.
- Unscrew the inner side panels if the model allows it.
- Clean the door seals with neutral soap and water.
- Inspect the rear fan to remove any dust accumulations.
Reassembly and post-cleaning operation tests
How to reassemble the parts correctly
After completing cleaning and cleaning maintenance small household appliances, the reassembly phase is equally critical of disassembly. The secret to a perfect reassembly lies in the order with which you kept the pieces. Start by repositioning the fan (if removed) and the resistance protection grid, ensuring that the screws are tight but without exceeding in force, not to spoil the threads in plastic or light metal. When you learn how to disassemble air fryer, you also learn that each piece has its own seat: if a component does not seem to be framed, do not force it. There is probably a cable that gets in the way or the piece is oriented in the wrong direction. Check the photos made at the beginning to check the exact positioning of each item.
Special attention should be given to the silicone seals and the rubbers of the basket grille. If these are not properly positioned, the basket may not close well, causing heat loss and uneven cooking. Once the outer shell has been reassembled, check that the buttons or the touch panel correctly respond to mechanical pressure. If you have disassembled the handle, make sure that it is solid and that there are no games: the safety in lifting a basket full of boiling food depends on the stability of these screws. Finally, pass a microfiber cloth clean and dry on the entire external surface to remove any fingerprints or residues of degrease remaining during the working phases, returning to the appliance its original splendor.
The vacuum sanitization procedure
The last fundamental passage, after understanding how to disassemble air fryer and reassembled it, it is the cycle of tests and sanification. Even if you have flushed each component well, there may be micro-residues of detergent or moisture in unseen areas. Connect the power supply and turn on the fryer by setting it at the maximum temperature (usually 200°C) for about 10-15 minutes, without entering any food inside. This operation, called “burn-off”, serves to evaporate any chemical residues and to sterilize the cooking environment thanks to the intense heat. It is normal to feel a slight technical smell during the first few minutes; however, if you smell burnt or see smoke coming out of the shell, turn off immediately and check not to have left residues inside the resistance zone.
During this vacuum test, it also observes the noise of the fan. If you feel unusual vibrations or metallic noises, it may mean that the fan or protection grid have not been fixed properly. Once the cycle is finished, let the appliance cool and your air fryer will be officially ready to return to service. This routine igienizing air fryer deep should be repeated at least once every six months, or more frequently if you use it daily. Such careful maintenance not only improves the taste of your dishes, eliminating the aftertastes of old fat, but optimizes electrical consumption, an increasingly important aspect in the energy context of 2026. Now you are ready to enjoy your favorite recipes again with the certainty of using a safe and perfectly clean device.
A clean appliance is an efficient device: the removal of fat from the resistance can reduce heating times by 15%, ensuring tangible energy savings on the electricity bill.
Frequently asked questions
Can I put all the fryer pieces in the dishwasher?
Not all components are suitable for the dishwasher. While the perforated basket and the collection tank of most models (such as Philips or Princess) are often washable in the dishwasher, other parts such as the handle (if it contains electronic components or sensors), the screws and of course the upper shell should never be immersed in water or put in the dishwasher. Always consult the frying instructions manual for safety. The intense heat and aggressive detergents of the dishwasher can over time ruin the non-stick coating, so hand washing remains the recommended option to preserve the longevity of the appliance.
What to do if the fryer emits smoke after removal and cleaning?
If after following the guide on how to disassemble air fryer and clean it known about smoking, the main causes can be two. The first is the presence of degreasing or detergent residues on the heating resistance: in this case, leave the appliance on in a ventilated place until the residue completely evaporates. The second cause could be a residue of dirt that was removed but not removed altogether, ending in direct contact with the serpentine. Turn off the appliance, let it cool and inspect the resistance area again with a flashlight to remove any remaining paper or dirt fragments.
How long do you need to disassemble the fryer for deep cleaning?
Frequency depends on use. For an average use of 3-4 times a week, a superficial cleaning of basket and tub should be made after each use. Partial disassembly to clean heating resistance and the upper time should take place every 3-4 months. A more technical disassembly of the shell to remove the dust from the cooling fans of the electronics can be carried out once a year. If you often cook very fat foods like chicken wings or bacon, the times are halved, as fat vapors tend to deposit much faster on the internal components than cooking frozen vegetables or precooked foods.
Can I use the oven degrease to clean the interior?
Yes, you can use a greasing machine for ovens, but with extreme caution. Make sure the product is compatible with aluminium or stainless steel surfaces and do not let it act over the recommended time to avoid corrosion. It is essential to never spray the product directly on the electrical components, sensors or inside the fan. Apply the degrease on a cloth or brush and then rub the affected areas. After use, rinse meticulously with a damp cloth only with water to eliminate any chemical trace that could contaminate food during subsequent high temperature cooking.
Why does the food smell bad despite cleaning the basket?
If you feel an unpleasant aftertaste or a smell of “old”, the problem almost certainly resides in fat residues accumulated on the resistance or on the top of the cooking room. These residues, heating up repeatedly, burn and release fumes that permeate food. In this case, follow the procedure on how to disassemble air fryer to access the upper area is the only effective solution. Deep cleaning with a solution of water and lemon can help neutralize persistent odors, bringing the appliance back to an optimal hygiene condition and ensuring that the taste of your dishes remains pure and unaltered.
Keeping your air fryer in excellent conditions is an investment that pays back in terms of health, taste and durability of the appliance. As we have seen, the procedure on how to disassemble air fryer requires attention and the right tools, but it is an operation within reach of all if performed with method and patience. Do not neglect the cleanliness of the resistance and the internal parts: these are those areas hidden to determine energy efficiency and quality of cooking. Following the advice of this updated technical guide to 2026, you will enjoy the performance of your appliance for many years to come. If you have specific doubts about your model, always consult the manufacturer's official documentation. Now that you know all the secrets for professional maintenance, you just have to put yourself at work and make your fryer shine. Good cleanliness and, above all, good appetite with your next healthy and crispy fry!


